


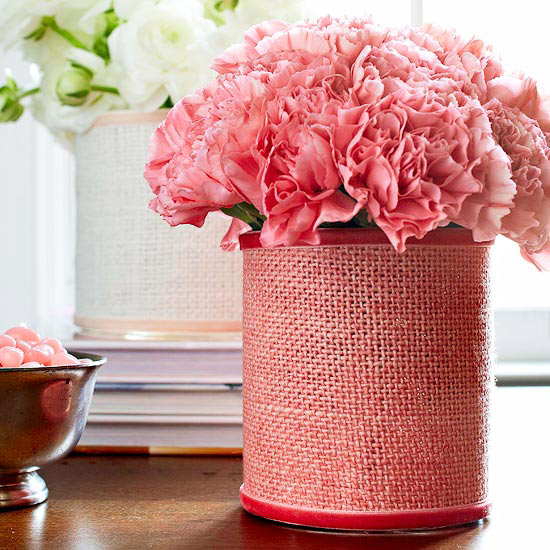
{The inspiration, from Better Homes and Gardens, Feb 2012}
In my house, we drink coffee every morning, as you know if you've read this post or this one. So, what to do with all these coffee cans? Of course I've saved them. You know I have ideas... :)
The top picture was my original inspiration. It's from the Feb 2012 issue of Better Homes & Gardens. Great way to use up my coffee cans! Read on for my how-to...

Materials:
Empty, washed coffee can
Fabric - enough to cover your can, which is not a lot. Raid your scraps or grab an old shirt.
Iron
Ruler
Scissors or rotary cutter
Fabric pen - or chalk...or a regular pen if you have sturdy fabric
Spray adhesive - or you can use double sided tape or other kind of glue.
How to:
1. Gather your materials! Notice that my scissors are missing from my materials picture. I went to cut my fabric & realized I didn't pull them out! Oops!
2. Iron your fabric. Make sure it lays nice & flat so that when you're cutting it, you don't have any jagged edges.

3. Wrap your fabric around your coffee can. You should probably do this with the right side of your fabric DOWN so that you are marking on the backside of your fabric. But! I didn't because my fabric marker wears off with exposure to air & I've used this fabric before. So I knew I was safe marking on the right side.
The selvage edge was still on my fabric. I used that as my starting point so that I had a nice straight line to start from. Then, I overlapped my fabric a bit on the back to account for ripping off the selvage edge & so that I would have a little extra overlap of fabric on my vase. Make a mark where you think there is enough overlap with your pen.
4. Lay your fabric on your cutting surface.

5. Measure the height of your coffee can. Mine was about 5.25 inches.
6. Using the awesome grid on my ruler as a guide, I drew a line 5.25 inches long down my fabric from the first mark I made.

7. Cut out your piece of fabric! Normally this is where my rotary cutter is the shining star. But! This time, I used scissors since we were at our summer rental house. Take your time here, going slowly & carefully so that you have a nice clean edge.

8. This is when I took my salvage edge off. The salvage edge is the part of the fabric that the weaving started from. It's not usually very attractive, but for me...and many sewers... it's a handy starting place for measuring. It's not something I want in my final project though, so off it came. It rips off easily. Just make a little cut with your scissors at the top & tear down the edge of your fabric. It's kinda fun!

9. Spray your can with adhesive or apply whatever glue product you are using. If you're using spray adhesive as I did, you really need to go outside. Spray adhesive can be very messy & I tend to get it everywhere. Check the direction of the wind as well. You want this stuff blowing AWAY from you.
Lightly coat your can with spray adhesive. Sorry...there aren't any pictures of me doing that. This is as close as my camera will ever get to a can of spray adhesive.

10. Start wrapping your fabric around the can! Go slowly & smooth as you go. It doesn't have to be perfect, but if you're having trouble lining up the fabric evenly on the top & bottom of the can, I recommend concentrating on the bottom portion. That is the part of your vase that will be most visible.

I had to go back & spray a few parts of the can close to the end again with adhesive, btw.

11. Admire your work! Fill it with flowers...or pens or whatever. Optional next steps are also to embellish the fabric. You can add ribbon as trim at the top or bottom, as in the example up top or a range of other fun pieces of flair.
A Note: Originally I did not put a glass jar inside my coffee can to hold the water & flowers. I don't think you really need it if you're only using the arrangement for a day or two. However! If you want to avoid a rusty coffee can, definitely get a glass jar of some kind to hide inside the can.
Hope you enjoyed this!! If you make one, send me pictures or post them on Facebook & I'll post them here!
PS If you want more ideas for what to do with your coffee cans, try these links. Or Google. There are LOTS of good ones...
Ombre vase - Doing. This.
60 recycled can projects
DIY on the cheap! - my personal fave
Pen Projects
DIY lanterns - here or here
2 comments:
Love it, Kerry! Hope VMG building fared well in Sandy! Xo Aynsley
Thanks Aynsley! Chris is down there today & all is well! xo!
Post a Comment